Planning benzodiazepine use, adjustment, or tapering can feel complex without the right guidance. This is where structured clinical frameworks become essential. One of the most widely referenced tools in this space is the Ashton Manual benzodiazepine equivalence table, a carefully developed guide that helps translate different benzodiazepines into comparable doses. By offering clarity on equivalence, this framework supports safe, structured, and physician-guided transitions.
The importance of such a resource lies in its ability to standardize understanding. Benzodiazepines differ in strength, duration, and effect, which means that comparing one medication to another is not always straightforward. The benzo equivalence chart provides a consistent reference point, allowing professionals to create personalized strategies that align with individual needs. Rather than relying on guesswork or general assumptions, this table introduces precision. It is not a tool for casual interpretation, but rather a clinical resource intended for use under the supervision of experienced professionals who understand its nuances and applications.
What Is the Ashton Manual Benzodiazepine Equivalence Table?
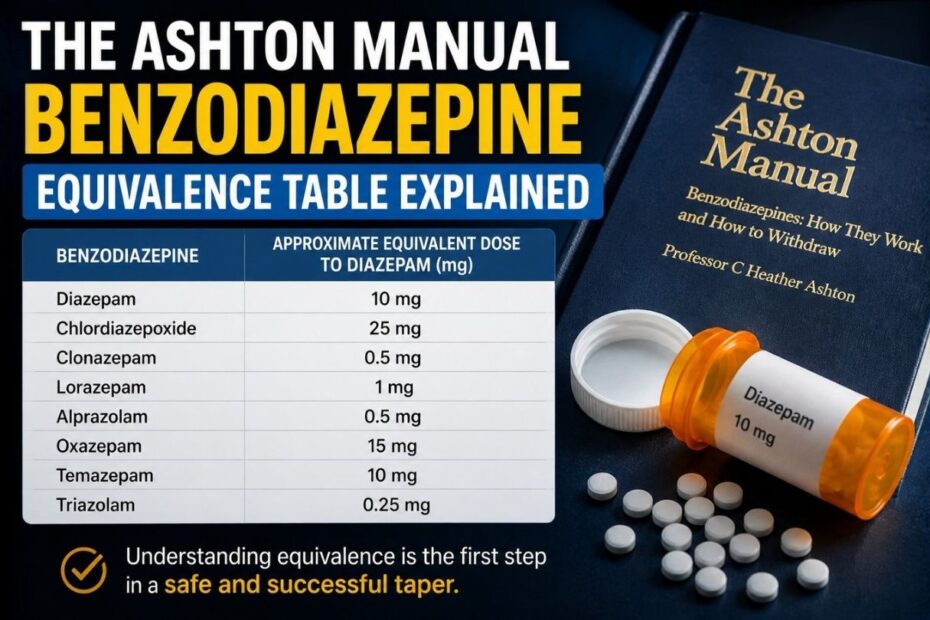
At its core, the benzodiazepine conversion table is a structured comparison of commonly prescribed benzodiazepines, showing how doses of one medication relate to another. It was developed to guide transitions between medications, particularly when a longer-acting option is needed for a more stable, manageable adjustment.
The table assigns equivalent values to medications, expressed in terms of the dose approximately equal to 10 mg of diazepam (Valium). Approximate equivalents in the Manual’s table include 0.5 mg of alprazolam (Xanax), 0.5 mg of clonazepam (Klonopin), 1 mg of lorazepam (Ativan), 20 mg of oxazepam, 20 mg of temazepam, 25 mg of chlordiazepoxide (Librium), and 10 mg of nitrazepam. These values are approximations rather than precise conversions: individual responses vary, and differences in half-life mean two equivalent doses do not behave identically over the course of a day. Used carefully, this equivalence allows a physician to plan smoother transitions without abrupt changes, ensuring consistency in the overall approach.
What makes the Ashton Manual particularly respected is its thoughtful and methodical structure. It is not just a list of numbers but a considered guide that reflects clinical experience and patient-centered principles. Each equivalence is grounded in a deeper understanding of how these medications interact with the body over time.
Read more: Ashton Manual Diazepam Switch: Converting Short-Acting Benzos Safely
Why Equivalence Matters in Professional Care
Equivalence is not just a mathematical concept; it is a cornerstone of effective and responsible benzodiazepine management. Without a clear understanding of how medications compare, transitions can become inconsistent and unpredictable. It also helps to remember who this table serves: most people using it became physically dependent on a medication taken exactly as prescribed. Dependence is not addiction, and equivalence planning is part of treating it as the medical condition it is.
The benzo equivalence chart ensures that every step in the process is deliberate. It allows professionals to maintain stability while adjusting medications, reducing uncertainty, and improving overall outcomes. This level of precision is especially important when developing structured plans that require gradual and consistent adjustments.
Careful interpretation matters as much as the numbers themselves. Each individual’s situation is unique, and applying the table requires expertise, experience, and careful monitoring. This is why working with a knowledgeable physician is essential. The ability to tailor the information from the table into a personalized approach makes all the difference.
Read more: Why You Control Your Benzo Reduction Speed
How the Benzodiazepine Conversion Table Is Used
The benzodiazepine conversion table is typically used as part of a broader, physician-guided strategy. It helps determine how to transition from one medication to another while maintaining balance and consistency. For a clearer view of how structured planning may be approached, the benzodiazepine taper calculator on this site helps present equivalence-based planning in an organized way when reviewed with a physician.
In practice, a physician uses the table to calculate equivalent doses, then designs a structured plan that aligns with the individual’s specific circumstances. This approach ensures adjustments are gradual and well-managed, resulting in a smoother overall experience.
The table also plays a key role in long-term planning. Providing a clear framework allows each stage of the process to be mapped out with confidence. This level of planning helps maintain consistency and ensures that every step is aligned with the overall goal.
Read more: How to Start a Gradual Benzodiazepine Taper: A Step-by-Step Guide
The Importance of Professional Guidance

While the Ashton Manual benzodiazepine equivalence table is a powerful resource, it is not intended to be used independently. Its effectiveness depends on proper interpretation and application, which requires clinical expertise.
Working with an experienced physician ensures that the table is used correctly and safely. A physician brings the knowledge needed to adapt the information to each individual’s needs, creating a plan that is both structured and personalized.
Medical support also provides reassurance and clarity throughout the process. Instead of interpreting complex information alone, individuals benefit from guidance that simplifies each step and ensures that everything is handled with care and precision.
A Structured Approach to Personalization
One of the key strengths of the benzo equivalence chart is its ability to support personalized planning. No two individuals are the same, and effective management requires an approach that reflects this. By using the equivalence table as a foundation, a physician can create a customized strategy that aligns with each person’s unique situation. This ensures that every adjustment is thoughtfully planned and carefully executed. The result is a more structured and predictable process. Instead of uncertainty, there is clarity. Instead of inconsistency, there is stability. This structured approach is what makes careful medical planning so valuable and effective.
Building Confidence Through Clarity
Understanding the benzodiazepine conversion table can bring a sense of clarity and confidence. When individuals know that a well-established framework guides their plan, it creates reassurance. This confidence is further strengthened by medical support. A physician not only interprets the table but also explains its role in the overall process, ensuring that individuals feel informed and supported at every step. The taper calculator on this site helps make equivalence details easier to understand as part of a physician-guided plan.
Clarity leads to confidence, and confidence plays a crucial role in achieving positive outcomes. By combining the structured guidance of the equivalence table with clinical expertise, individuals can move forward with a clear and well-defined plan.
Why the Ashton Manual Remains a Trusted Resource
The Ashton Manual benzodiazepine equivalence table remains widely respected for its thoughtful and methodical approach. It reflects a deep understanding of benzodiazepine management and emphasizes the importance of structure, consistency, and careful medical supervision. Ashton Manual Guide explains how the Manual’s table fits into structured benzodiazepine taper planning.
Its enduring relevance comes from its ability to provide clarity in a complex area. By offering a standardized reference point, it helps physicians plan more precise and effective transitions. This level of trust is not built overnight. It comes from years of consistent application and a strong foundation in clinical principles. For individuals seeking a structured and reliable approach, the Ashton Manual remains an invaluable resource.
Moving Forward with Professional Support

Effective benzodiazepine management benefits greatly from professional guidance. Tools like the benzo equivalence chart and benzodiazepine conversion table provide the structure, but it is the judgment of an experienced physician that brings these tools to life.
With the right support, individuals can approach this process with confidence and clarity. Every step is guided, every decision is informed, and every plan is tailored to meet specific needs. This combination of structured resources and careful medical oversight creates a path that is both effective and reassuring. It turns a complex process into one that is manageable and well-supported.
Conclusion
The Ashton Manual benzodiazepine equivalence table serves as a trusted, structured framework for understanding how different benzodiazepines compare and for approaching transitions with clarity and consistency. By offering standardized reference values, it helps create a more predictable, physician-guided path. This clarity, combined with a personalized approach, ensures that every step is thoughtfully planned and aligned with individual needs.
The table is a map, not a schedule: it shows how doses correspond, while the pace of any change still belongs to the individual and their physician. To see how equivalence values translate into gradual reduction plans, the benzodiazepine taper calculator illustrates stepwise schedules, and Ashton Manual Diazepam Switch: Converting Short-Acting Benzos Safely shows the table at work in a crossover taper.
FREQUENTLY ASKED QUESTIONS
What is the Ashton Manual benzodiazepine equivalence table?
The Ashton Manual benzodiazepine equivalence table is a clinically recognized reference that compares the relative strengths of different benzodiazepines. It provides a structured way to understand how one medication dose corresponds to another, helping physicians create consistent and well-planned strategies when adjustments or transitions are needed. Rather than being a simple comparison chart, it is part of a broader framework designed to support clarity, stability, and precision in benzodiazepine management.
How do I use a benzo equivalence table?
A benzo equivalence chart is not meant to be used independently but rather as a clinical tool within a guided plan. A physician uses the table to calculate equivalent doses between medications and then designs a structured approach tailored to the individual. This ensures that any transition is smooth, consistent, and aligned with specific needs. Professional guidance is essential because interpreting the table requires experience, accuracy, and an understanding of each person’s situation.
How much diazepam is equivalent to my benzo?
The exact equivalent dose of diazepam depends on the specific benzodiazepine and its potency. As approximate examples from the Manual’s table, 0.5 mg of alprazolam, 0.5 mg of clonazepam, and 1 mg of lorazepam are each listed as roughly equivalent to 10 mg of diazepam. These values are starting estimates, not precise conversions, and they should be interpreted with a physician. Each individual’s situation is unique, and equivalences are used to create a careful, customized plan that maintains consistency and stability throughout the process.
Are benzodiazepine equivalence tables accurate?
Benzodiazepine equivalence tables, including the Ashton Manual benzodiazepine equivalence table, are widely respected and used as reliable clinical references. They are designed to provide a standardized foundation for comparison, enabling informed decisions. Their values are approximations, though, and their real usefulness comes from how they are applied: interpreted carefully and combined with a physician’s judgment, they become an effective tool for building structured, personalized, and well-managed tapering plans.